How to repaint aircraft for FS2004 and FSX - Part 1
Introduction
There are many free aircraft liveries available for FS2004 and FSX on various websites, including the one you looking at right now. These free files - which are created by a relatively small group of flight simmers - vary in quality from lousy to extremely accurate. While the painter has put in many hours on just a single livery, we're downloading them in an instant! However, not all real world liveries might be available for your favorite aircraft. So, you can wait until someone decides to paint it or you can paint it yourself. In case you decide to paint it yourself, read on and prepare for something that might look easier than it is...
All aircraft in FS are build up of a 3d model and textures. The 3d model is the shape, the textures make how the aircraft looks in terms of color, logos, etc. Repainting is nothing more than modifying the existing textures. This is usually done by using a paintkit, which is a set of blank textures provided by the developer of the aircraft. Simply said, it comes down to painting the livery on the blank textures and put those in the aircraft folder.
NOTE: Before you read any further, realize that it takes quite some time to learn how to repaint, especially if you don't have any knowledge or experiments with Photoshop.
What are textures?
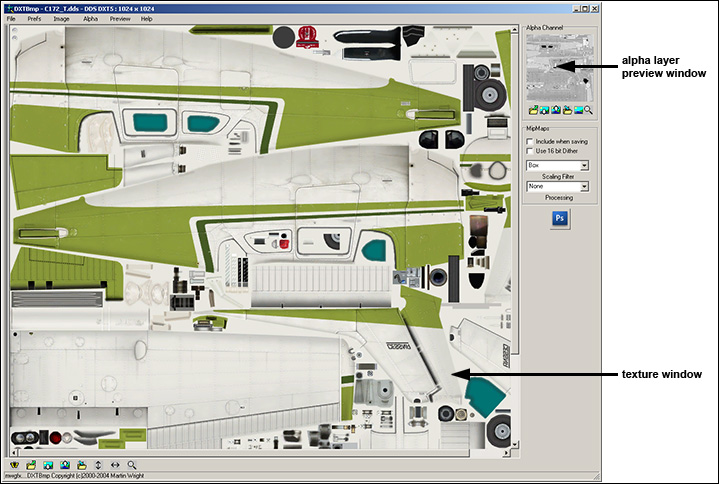
A texture file is a collection of images for various parts of an aircraft. The textures that are used in FS2004 are special bitmap files that end with ".bmp" (.dds files in FSX). These files contain a visible layer and an alpha layer, called "alpha channel". While the visible layer is just a collection of images of the aircraft parts, the alpha layer is another image of the same resolution that takes care of the reflection. As seen below, the alpha channel is build up of grey areas. The darker the color, the more reflection is visible on a certain part of the aircraft (assuming that reflections are enabled in the display settings in FS). In this case, it's clearly visible that the bare metal of the lower part of the fuselage is more reflective than the rest.
In the default 737-400 texture below, we see the images of the wings, fuselage, etc. This images are not placed randomly, but need to be on an exact spot. The images in the textures of the other 737-400 liveries in FS2004 are all placed on the same spot. The 3d model contains data which says where to find the image of a certain part of the aircraft within the texture file. It is called "texture mapping". This texture is 1024 by 1024 pixels, which is the resolution. If the resolution is smaller, 512x512 for example, the sharpness will be less when the aircraft is seen from up close in FS. So, reducing the resolution is not good for the quality, but it requires less memory of your video card.
Programs that are required
These are the programs required for this tutorial:
Photoshop is a very expensive program, but one of the best graphics editors out there. The trail version is free, but is limited to 30 days. There is another one: Paintshop Pro by the Corel Corporation. It's quite cheap compared to Photoshop and there is also a free trial version available. In this tutorial I use Photoshop because the vast majority of developers are using it and provide photoshop (.psd) files in their paintkits. These files include premade layers that make it a lot easier to paint a livery.
Note: Some knowledge of how photoshop works is required. Basic understanding of layers is a must. Also, in this tutorial I assume you're using a relatively recent Photoshop version, at least not older than v8.0 (Photoshop CS). Version 10.0 (CS3) is used in this tutorial.
Another program that can be helpful is Adobe Illustrator. Although it is absolutely unnecessary for repainting and not easy to learn, it can produce very sharp vector graphics for lines and logos. For example, Illustrator has been used for the Malaysia 'Heliconia' paint that is available on the download pages.
Dxtbmp is a small program that converts textures to normal graphics files and vice-versa. It can open and save various texture formats.
Paintkit
For this tutorial, we are going to paint the freeware Boeing 777-200 made by Project Opensky. First you need to download the paintkit. Click here to go to the Project Opensky website.
Now browse down to the 777-200 downloads and click on the link "Paint Kit" and download the paintkit. The filename should be "OS772V2_public_paintkit.zip". Once you have downloaded the paintkit, unzip it to any location you prefer. Now go ahead and start Photoshop. Open the file "opensky772v2_public_paintkit.psd", which is located here: OS772V2_public_paintkit/fuselage. This .psd file contains all you need to paint the fuselage of the aircraft, both sides. All parts are layered with colors to make it easier to see which side you are painting.
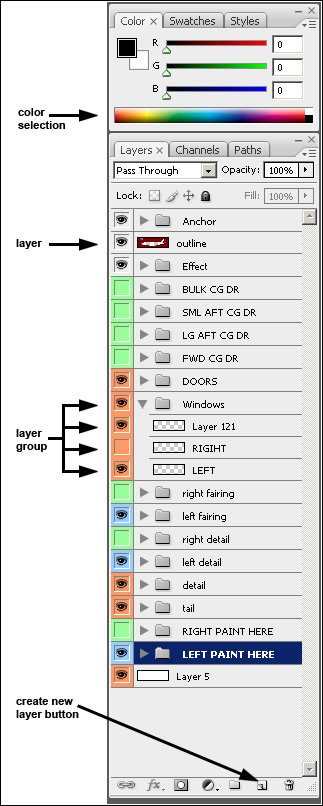
As seen in the screenshot on the left, all parts and details are placed in layer groups that contain a number of layers. When you click on the arrow symbol on the left side of a layer group, the group will open and show the layers it contains.
When you start to paint, you have to click on the layer group "LEFT PAINT HERE" and add all your new layers into that group.
Example: If you want to make the fuselage blue, then you need to select the layer group "LEFT PAINT HERE", click on the arrow icon on the left so it points down and then create a new layer, which can be done with the create new layer button on the bottom. Select what kind of blue you want to use at the color selector. Just use the Paint Bucket Tool to fill the fuselage with blue.
Note that the layer order as seen in the layer window decides if a layer appears on top of another one or below the other layer. When you color the fuselage and then add a logo, the logo must be higher in the layer window or within the layer group, so it is on top of the fuselage color.
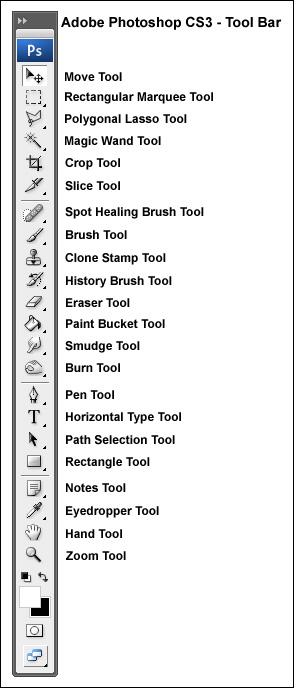
The tools we are going to use are named in the screenshot in the middle. These tools are available in older versions of Photoshop as well. The majority of the tools have a small arrow that points down to the right. This means that there are more similar tools available behind the active tools. Click and hold the left mouse button to show them and/or select them.
Before we begin, we have to decide what kind of livery we want to paint. This can be a real world livery of an existing aircraft or maybe a fantasy livery. In this tutorial, we will paint the Korean Air livery. Why? Well, it is a relatively simple livery. It is best to search for photos of 777-200s of this airline and check the availability of logos.
Photos
There are quite a few websites with aviation photos, I name a few of the larger sites:
Airliners.net
JetPhotos.Net
PlanePictures
airpics.com
MyAviation.net
Many aviation photo websites do have a search engine, so you can use it to select to display only Boeing 777-200s in Korean Air livery. Just collect 20-30 photos if possible and at least a few of the right and the left side. Photos of the nose, tail and engines can be of use as well.
Logos
Although it is possible to use a logo from a photo, its better to look for vector based logos. Vector images have a great advantage: you can resize them without loss of quality.
The shapes of vector images stay smooth even if someone would make them so big that it would fit on the wall of a large building. The website Best Brands of the World offers free logo downloads in .eps format that can be imported in Photoshop.
A search for "Korean Air" results in at least 4 logos (at the time I wrote this). One of them includes the main logo and also the Skyteam logo. This one can be used for both the fuselage and tail: